
- DrayOS 5
DrayTek EasyVPN Setup Guide
I. Product Setup Guides
EasyVPN is DrayTek’s unified, simplified VPN system that allows remote users to connect using IPsec, WireGuard, or OpenVPN without needing to manually manage certificates, keys, or configuration files. It also provides automatic fallback between VPN protocols to ensure reliable connectivity.
This guide applies to DrayTek models supporting EasyVPN, including:
Vigor2136, Vigor 2767, C510/C410, Vigor2962, Vigor3910, Vigor3912, and others running the required firmware.
Prerequisites
- Ensure the router firmware supports EasyVPN (DrayOS 5 firmware v5.3.1 or DrayOS 4 v4.4.5).
- Ensure WAN IP is publicly reachable (not behind CG-NAT).
- Configure NTP time sync under System Maintenance > Time or System Maintenance > Device Settings.
DrayOS
Vigor Router Setup
1. Enable VPN & EasyVPN Services
Go to VPN and Remote Access > Remote Access Control and enable: EasyVPN and the desired VPN protocols to use.
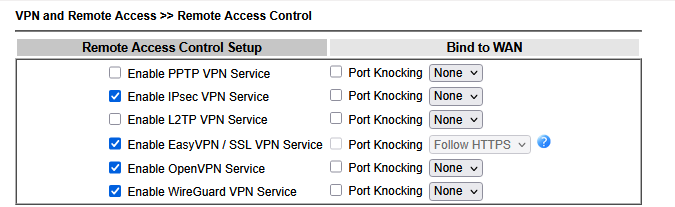
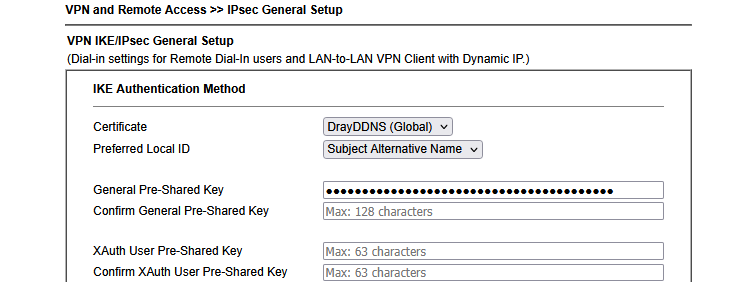
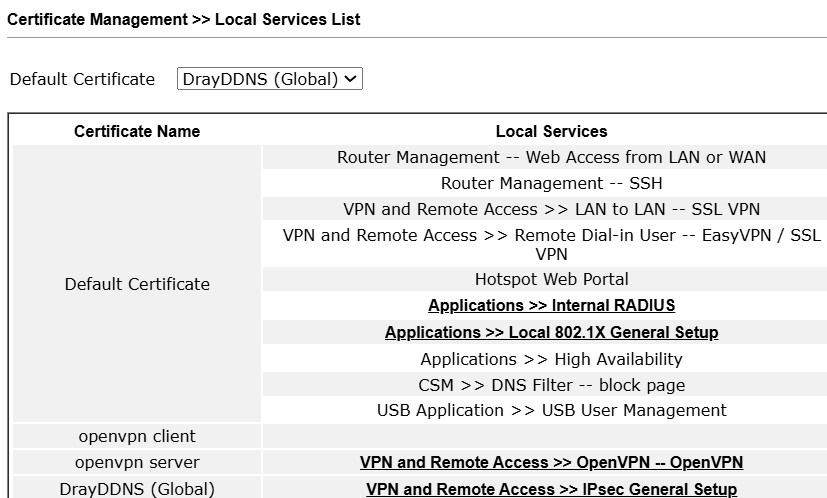
IPsec: Select the Certificate for the IPsec Dial-In connection
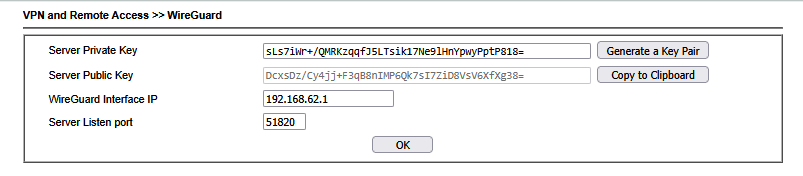
WireGuard: Generate the Key Pairs for the WireGuard VPN server.
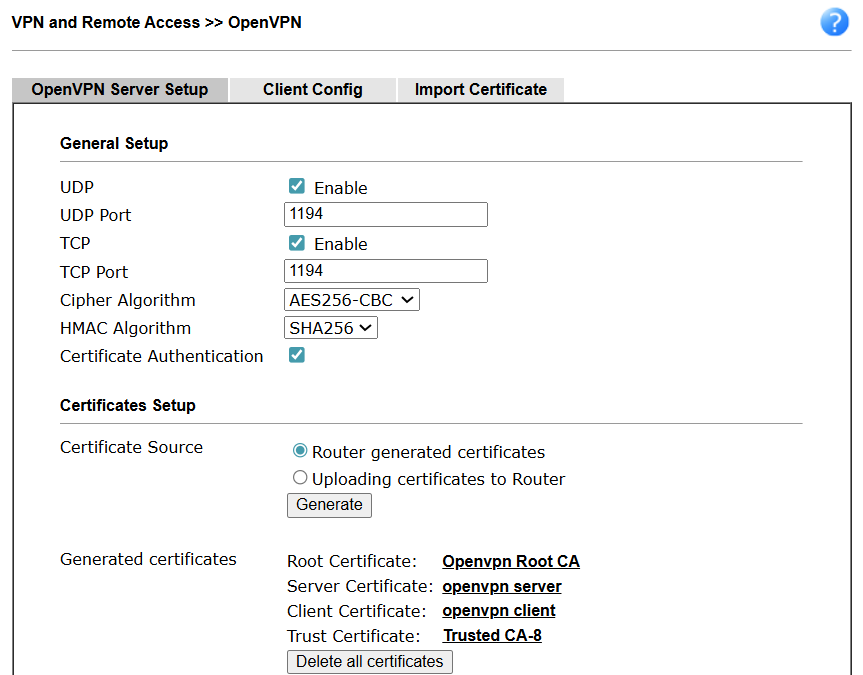
OpenVPN: Enable the Open VPN function and Generate the Router Certificates for OpenVPN Dial-In connection.
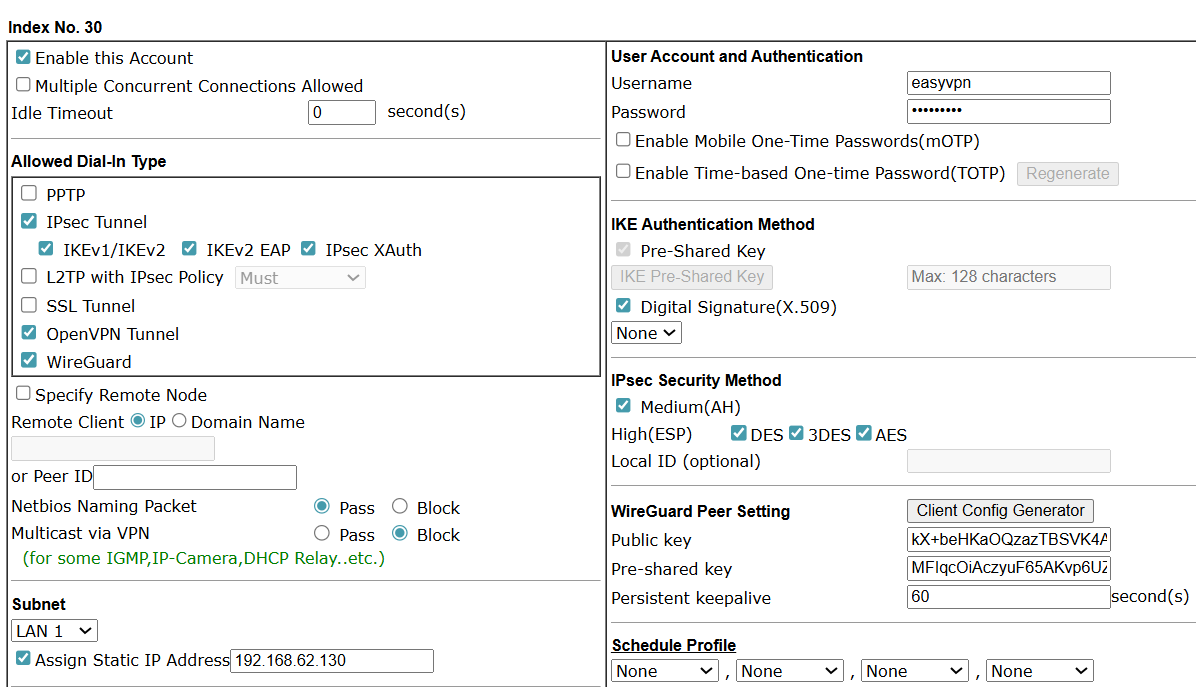
2. Create Remote Dial-in User
Navigate to VPN and Remote Access > Remote Dial-in User: then click on an available index number.
- Enable the account
- Enter username and password
- Select allowed Dial-in protocols (IPsec, WireGuard, OpenVPN)
- For WireGuard: Assign static IP and use Client Config Generator to generate the Key Pairs
- Click OK to save the settings.
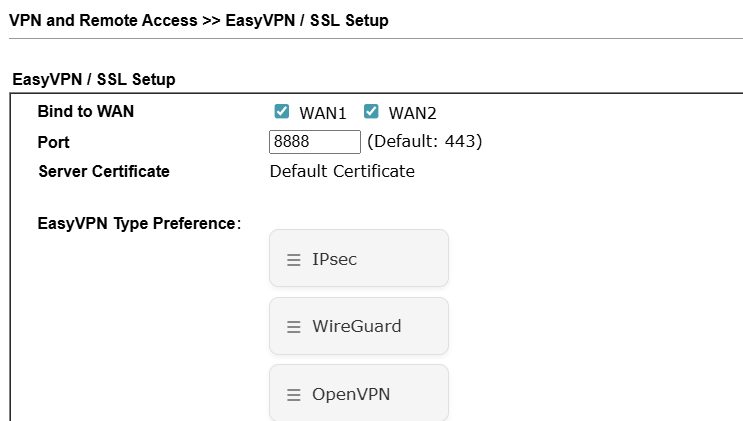
3. Configure EasyVPN Service
Navigate to VPN and Remote Access > EasyVPN and SSL Setup:
- Bind EasyVPN to the desired WAN
- Set EasyVPN service port
- Ensure WAN HTTPS management is enabled
- Adjust protocol priority (default: IPsec > WireGuard > OpenVPN)
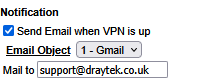
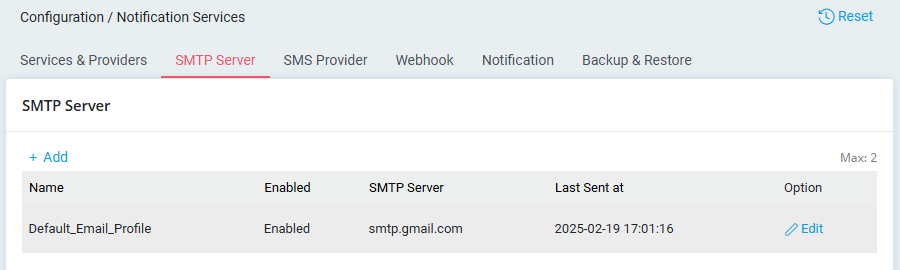
4. To enable Email OTP as the authentication method, first create a Mail Service Object by navigating to Objects Setting → SMS/Mail Service Object on the router. After that, enter the user’s email address in the Notification Settings section of their VPN Remote Dialin User profile.
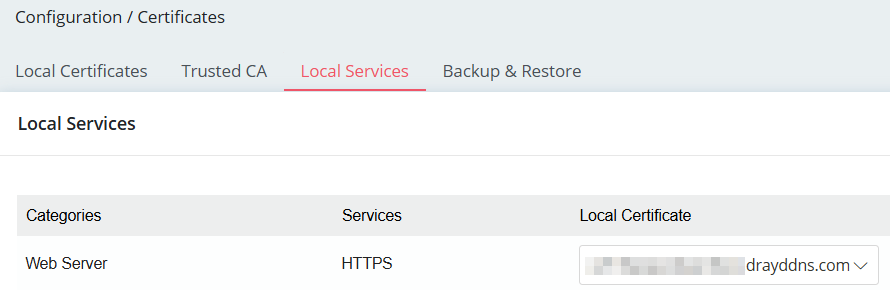
5. To use EasyVPN on an iOS device, it is necessary to select a valid certificate, such as a Let’s Encrypt certificate, for the HTTPS service on the Vigor Router.
DrayOS
Windows Smart VPN Client Setup
Authentication Type: Username and Password
- Before using EasyVPN, ensure that the native OpenVPN and WireGuard applications are installed on your Windows device. Alternatively, you can install SmartVPN Client version 5.7.1 or later, which automatically includes the required OpenVPN and WireGuard components during setup.
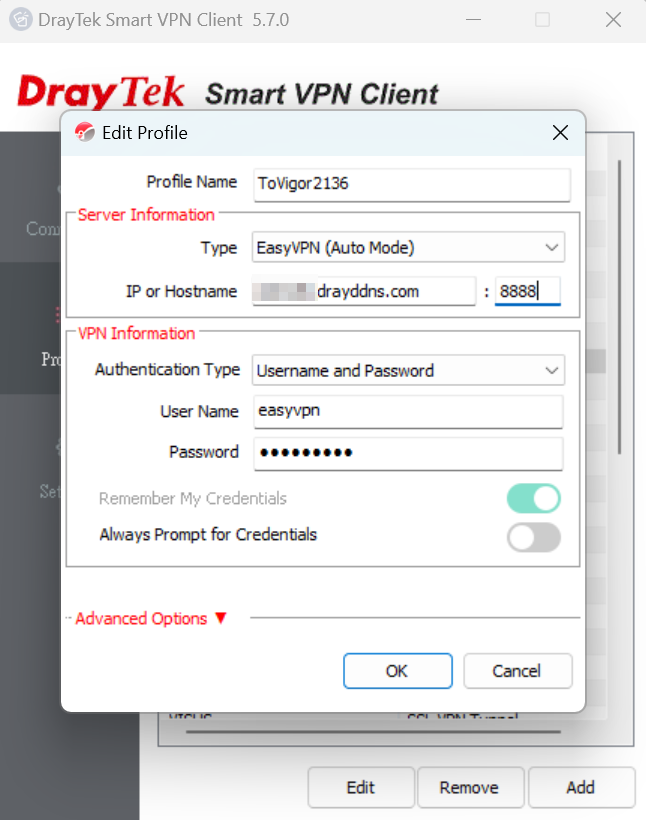
- Create a new VPN profile, select EasyVPN (Auto Mode) as the VPN type, enter the VPN server’s IP address or domain name along with your username and password, then click OK to save the profile.

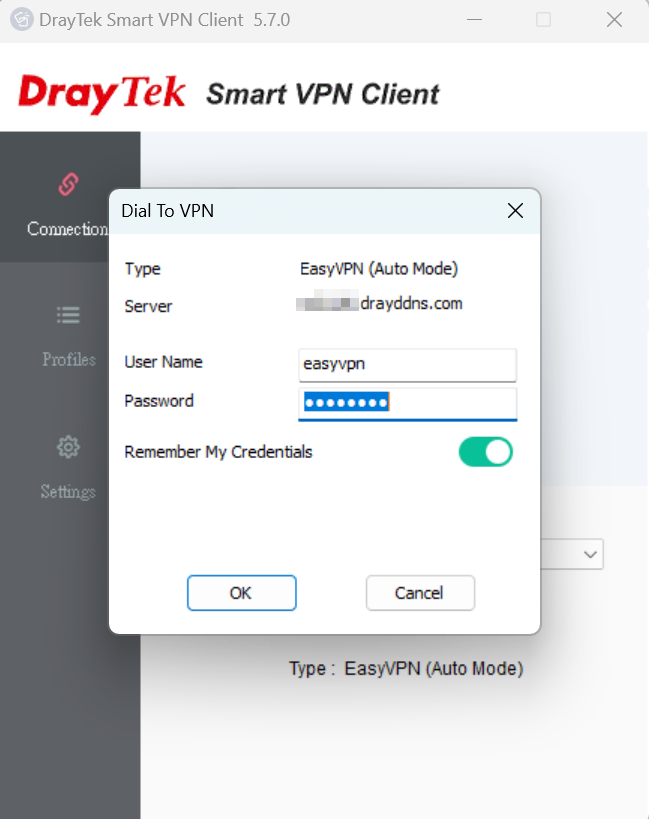
- Switch on Connect. A Dial to VPN prompt will appear, enter the password to initiate the VPN connection.

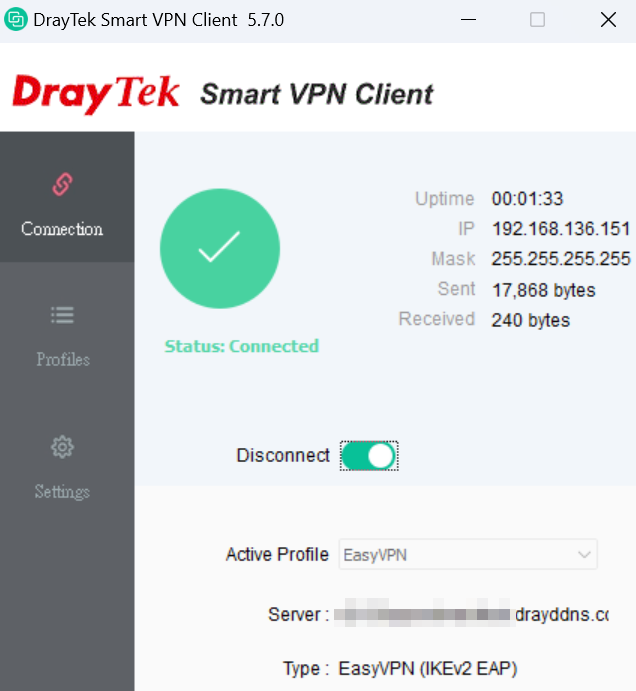
- EasyVPN is connected.

- The VPN client provides a Preferred Protocol option that allows users to choose which VPN protocol should be attempted first. For example, if a user is unable to connect via IPsec but can successfully connect using WireGuard, we recommend setting WireGuard as the Preferred Protocol within the SmartVPN Client’s VPN profile. This ensures that future connection attempts prioritize WireGuard for improved reliability.
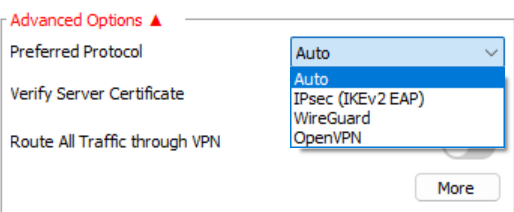
Verify Server Certificate determines whether the EasyVPN server's certificate will be verified. The EasyVPN server uses the same certificate as the HTTPS server. When enabling this option, the EasyVPN server needs to have a valid certificate installed, such as Let’s Encrypt Certificate for its Web/HTTPS server.
Authentication Type: Email OTP
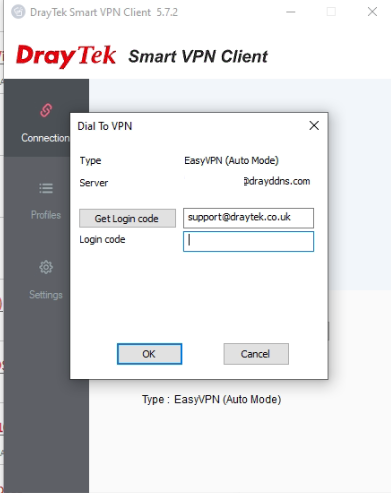
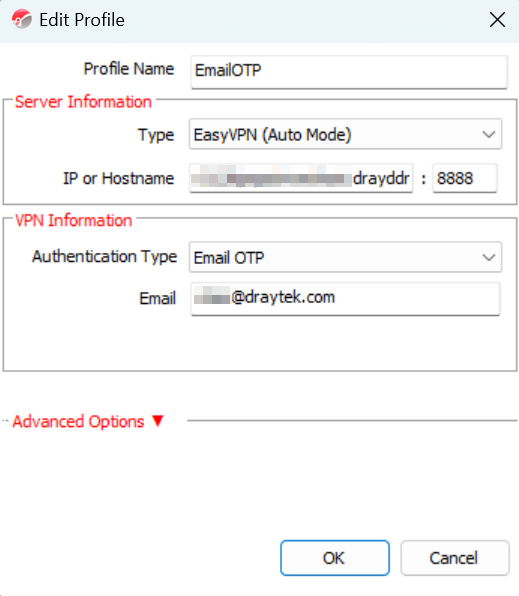
- Add a VPN profile, select EasyVPN (Auto mode) as the VPN type, enter the VPN server’s IP or domain name, select Email OTP as the Authentication Type, enter the user’s email address, then click OK to save the settings.

- Switch on Connect. A Dial To VPN prompt will appear, click the Get Login code button. The login code will be sent from Vigor2136 to the user’s email.
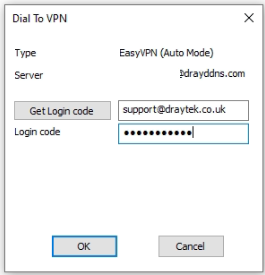
- Check the mailbox to get the code from the email.

- Enter the code in the Dial To VPN prompt window, then click OK.
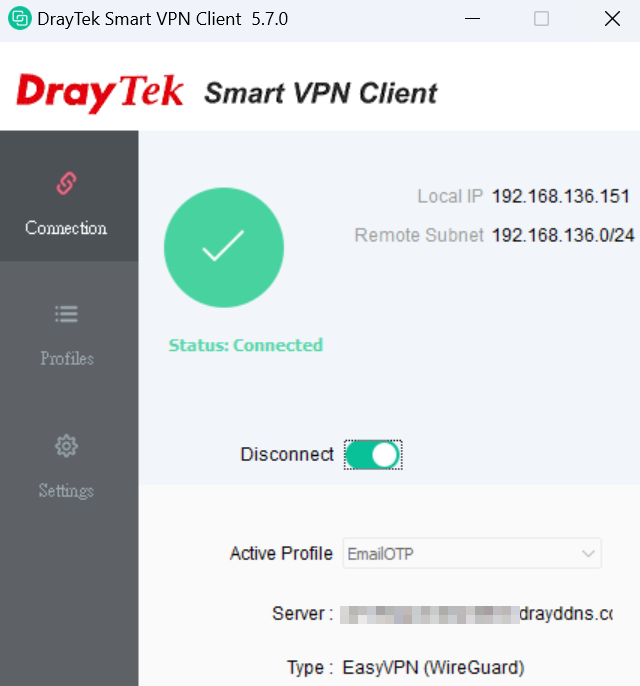
- EasyVPN is connected.
DrayOS
Android SmartVPN App Setup
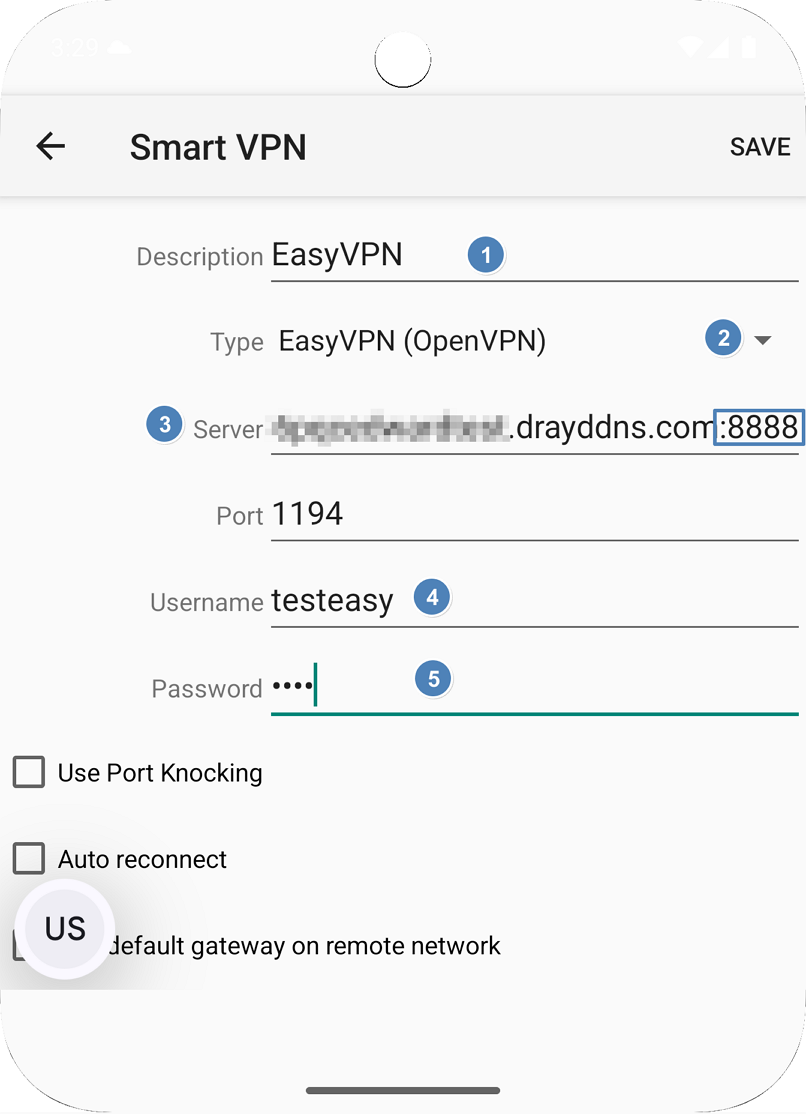
- Add a VPN profile.
- Enter a name for the Profile Description
- Select OpenVPN as the VPN type
- Enter the VPN server’s IP or domain name and appending: if the EasyVPN server is using a customized port.
- Enter the username and the password
- Click Save to save the settings.
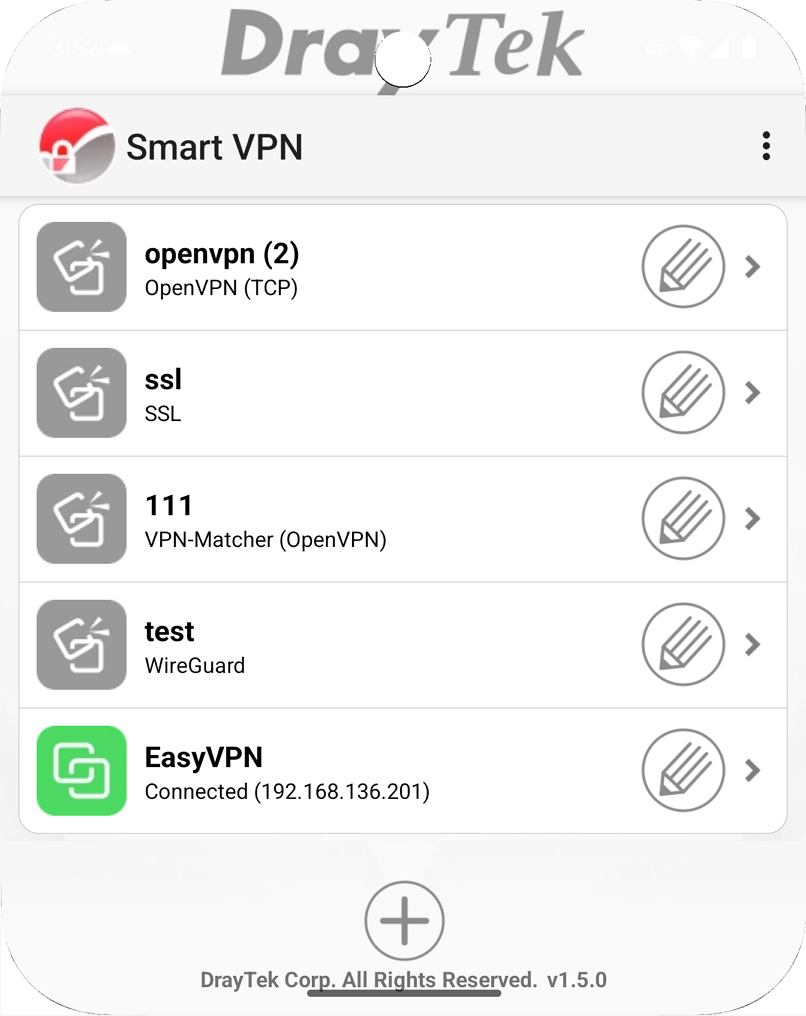
- Switch On Connect. EasyVPN connection is successfully connected.
DrayOS
iOS Smart VPN Client Setup
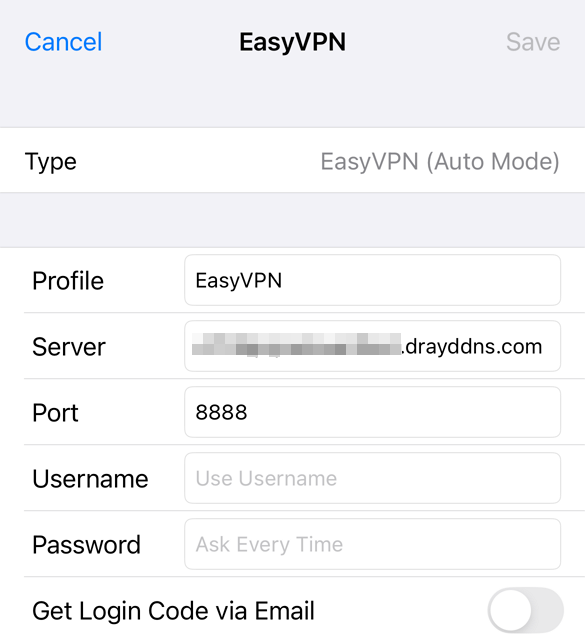
- Run SmartVPN app and add a profile as follows:
- Select EasyVPN (Auto Mode) as Type
- Give it a Profile Name
- Enter the VPN server’s Domain Name, which applied with a valid certificate for HTTPS service.
- Enter the EasyVPN port configured on the VPN server
- Enter the Username and Password.
- Save the profile.
- Switch on the profile, then switch on Connect to start the VPN connection. EasyVPN connection is successfully connected.
DrayOS
macOS Smart VPN Client Setup
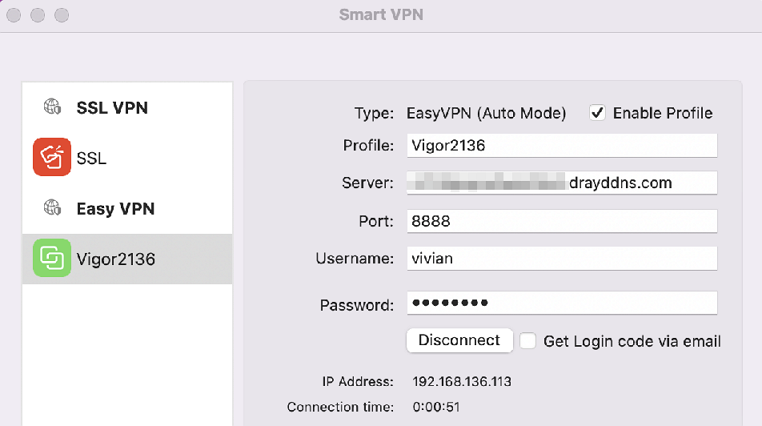
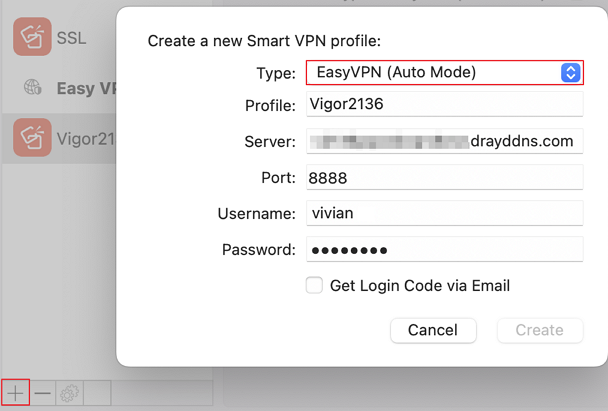
- Run SmartVPN app and add a profile as follows:
- Select EasyVPN (Auto Mode) as Type
- Give it a Profile Name
- Enter the VPN server’s Domain Name, which applied with a valid certificate for HTTPS service.
- Enter the EasyVPN port configured on the VPN server
- Enter the Username and Password.
- Save the profile

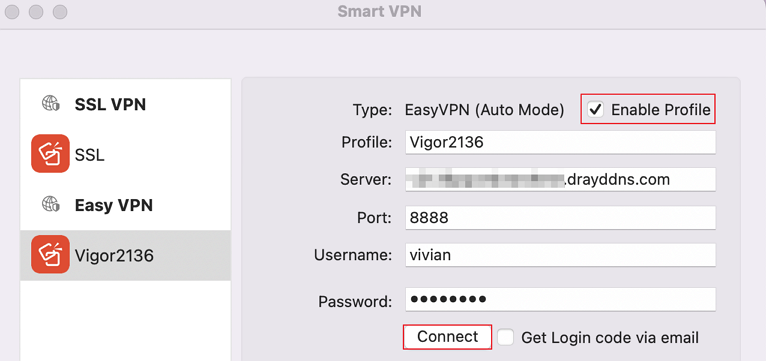
- Tick Enable Profile to enable this profile and click Connect to dial up the EasyVPN connection.

- EasyVPN connection is successfully connected.
DrayOS 5
Vigor Router Setup
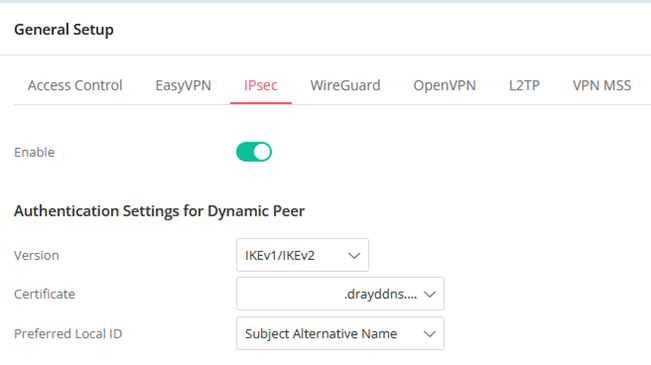
- Navigate to VPN > General Setup to enable VPN & EasyVPN Services and configure the corresponding settings:
- IPsec: Select the Certificate for the IPsec Dial-In connection. It is recommended to use a Let's Encrypt Certificate
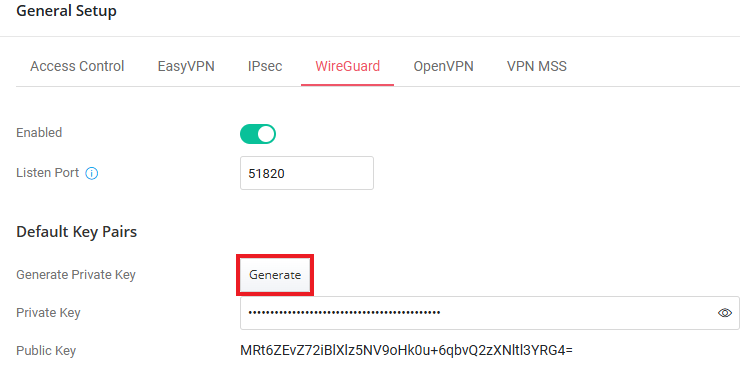
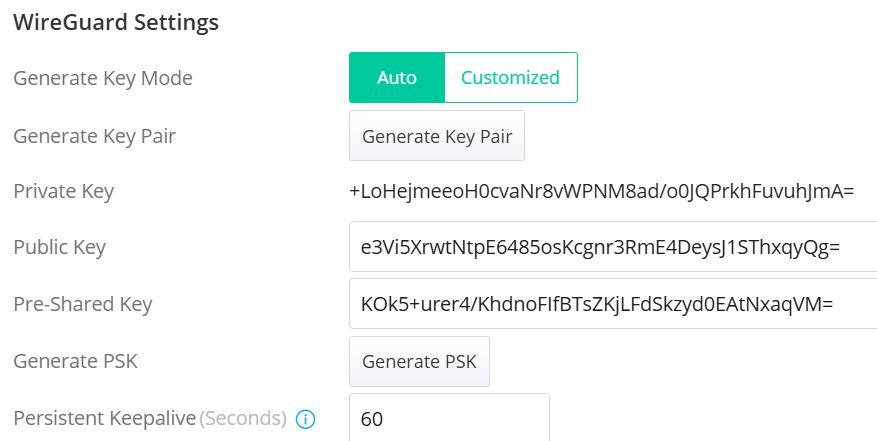
- WireGuard: Generate the Key Pairs for the WireGuard Dial In connection.
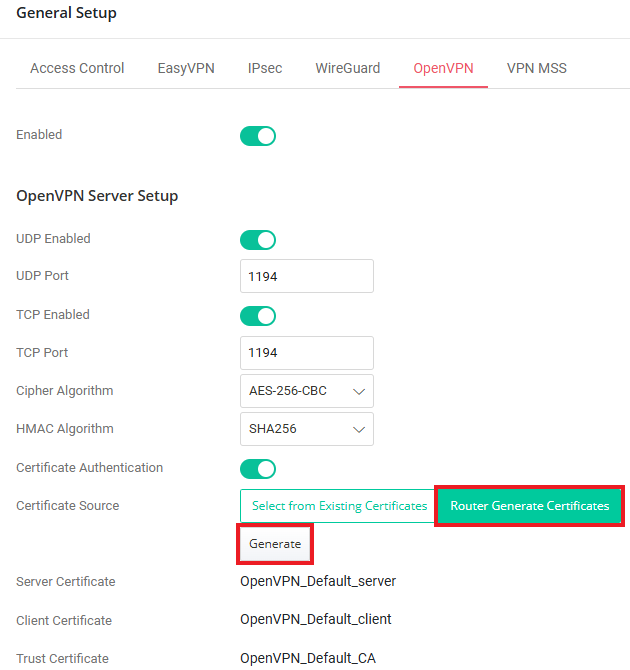
- OpenVPN: Generate and Select the Router Certificates for OpenVPN Dial-In connection.
- IPsec: Select the Certificate for the IPsec Dial-In connection. It is recommended to use a Let's Encrypt Certificate
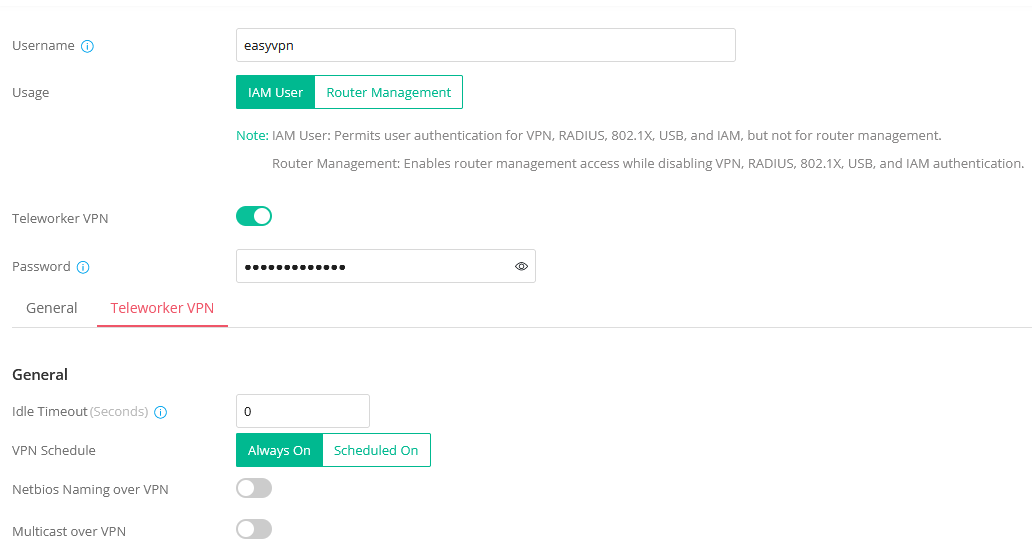
- Create a Teleworker VPN User Profile.
- Navigate to VPN > Teleworker VPN, click Add, and enter the Username and Password.
- Switch on Enable Teleworker VPN.
- Set Idle Timeout as 0.
- Select the VPN Schedule as "Always On"
- Under Allowed VPN Protocols, enable IPsec, OpenVPN and WireGuard. It is recommended to deselect IKEv1/v2 since EasyVPN could not use this option to dial in while using a dynamic IP address.
- Click Generate Key Pair and Generate PSK to create the WireGuard settings for the user.

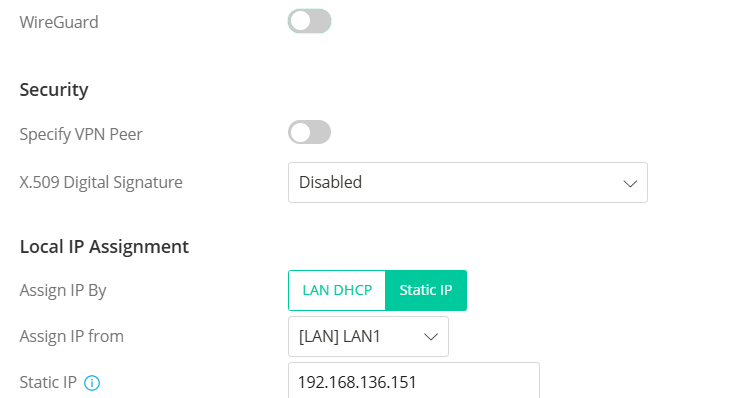
- In Local IP Assignment, choose a LAN subnet for Assign IP from the LAN DHCP or configure a static IP for Static IP. Static IP must be used if WireGuard Protocol is enabled in the profile.
Please note that the Static IP option is not available when WireGuard is selected in the current firmware version. To assign a fixed IP to the VPN user, first deselect WireGuard and choose Static IP. Then, reselect WireGuard.
- Click Apply to save the settings.
- In the User Information section, switch on the “Enable Email” option and enter the user’s email address. This will allow users to receive OTP by email for authentication.
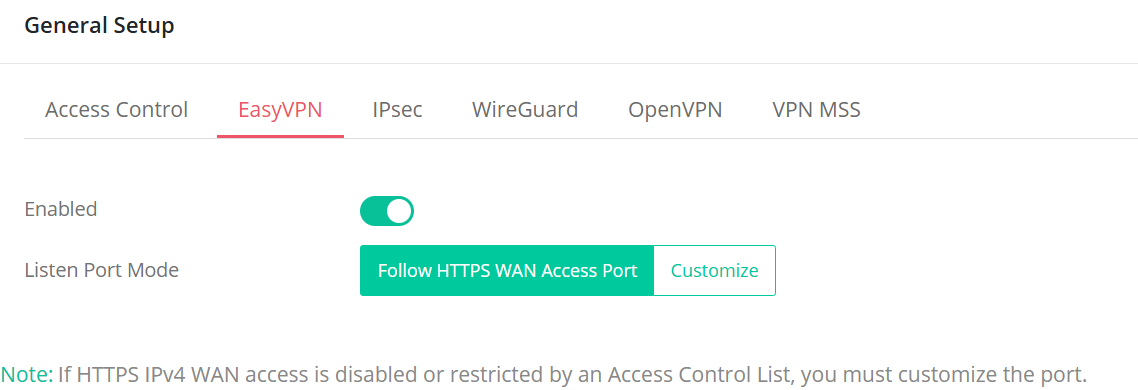
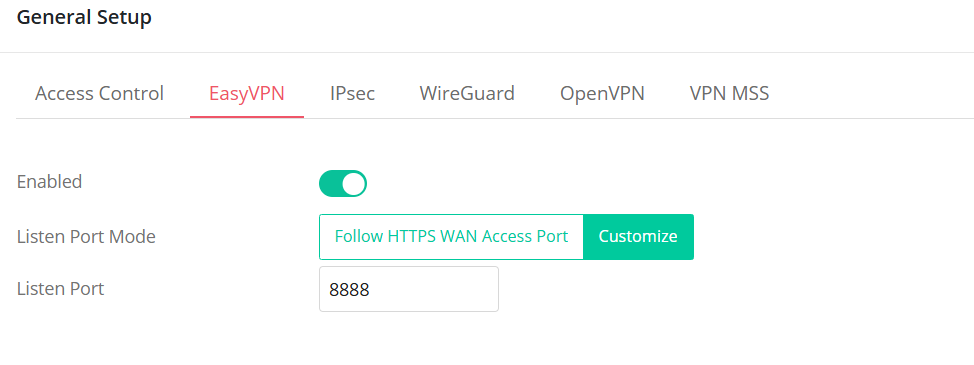
- Navigate to VPN / General Setup/ EasyVPN and Enable the EasyVPN service.
- The Listen Port mode allows users to configure the ports that the EasyVPN service listens to.
- Follow HTTPS WAN Access Port: This option uses the same port as the HTTPS Management port for the EasyVPN service. Note that HTTPS Management from the WAN must be enabled to allow the EasyVPN client to communicate with the EasyVPN server.

- Customize: This option allows users to manually configure the port for the EasyVPN service.
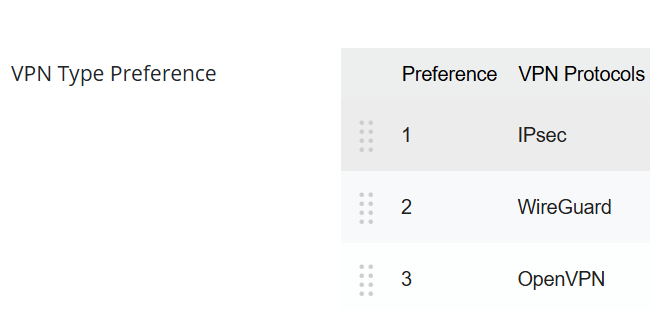
- The VPN Type Preference feature allows users to customize the priority of Dial-In VPN connections. By default, the sequence is arranged based on VPN performance: IPsec > WireGuard VPN > OpenVPN. To adjust the order, simply drag and rearrange the items in the provided interface.
DrayOS 5
Windows Smart VPN Client Setup
Authentication Type: Username and Password
- Before using EasyVPN, ensure that the native OpenVPN and WireGuard applications are installed on your Windows device. Alternatively, you can install SmartVPN Client version 5.7.1 or later, which automatically includes the required OpenVPN and WireGuard components during setup.
- Create a new VPN profile, select EasyVPN (Auto Mode) as the VPN type, enter the VPN server’s IP address or domain name along with your username and password, then click OK to save the profile.
- Switch on Connect. A Dial to VPN prompt will appear, enter the password to initiate the VPN connection.
- EasyVPN is connected.
- The VPN client provides a Preferred Protocol option that allows users to choose which VPN protocol should be attempted first. For example, if a user is unable to connect via IPsec but can successfully connect using WireGuard, we recommend setting WireGuard as the Preferred Protocol within the SmartVPN Client’s VPN profile. This ensures that future connection attempts prioritize WireGuard for improved reliability.
- EasyVPN is connected.

- Verify Server Certificate determines whether the EasyVPN server's certificate will be verified. The EasyVPN server uses the same certificate as the HTTPS server. When enabling this option, the EasyVPN server needs to have a valid certificate installed, such as Let’s Encrypt Certificate for its Web/HTTPS server.
Authentication Type: Email OTP
- Add a VPN profile, select EasyVPN (Auto mode) as the VPN type, enter the VPN server’s IP or domain name, select Email OTP as the Authentication Type, enter the user’s email address, then click OK to save the settings.
- Switch on Connect. A Dial To VPN prompt will appear, click the Get Login code button. The login code will be sent from Vigor2136 to the user’s email.

- Check the mailbox to get the code from the email.

- Enter the code in the Dial To VPN prompt window, then click OK.

- EasyVPN is connected.

Android SmartVPN App Setup
- Add a VPN profile.
- Enter a name for the Profile Description
- Select OpenVPN as the VPN type
- Enter the VPN server’s IP or domain name and appending: if the EasyVPN server is using a customized port.
- Enter the username and the password
- Click Save to save the settings.

- Switch On Connect. EasyVPN connection is successfully connected.

DrayOS 5
iOS Smart VPN Client Setup
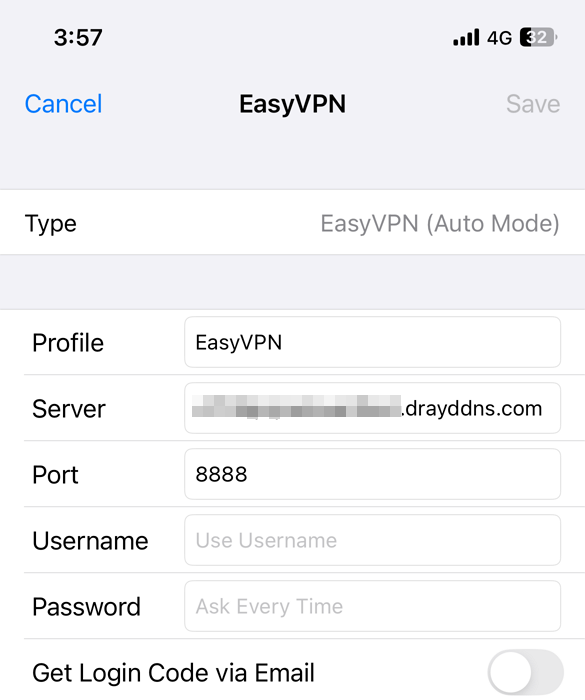
- Run SmartVPN app and add a profile as follows:
- Select EasyVPN (Auto Mode) as Type
- Give it a Profile Name
- Enter the VPN server’s Domain Name, which applied with a valid certificate for HTTPS service.
- Enter the EasyVPN port configured on the VPN server
- Enter the Username and Password.
- Save the profile.
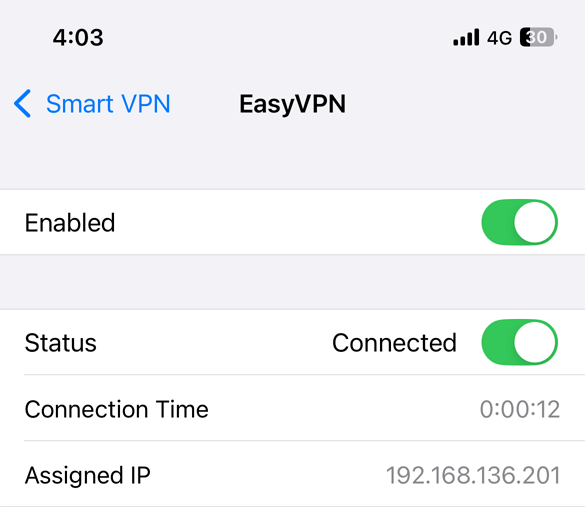
- Switch on the profile, then switch on Connect to start the VPN connection. EasyVPN connection is successfully connected.

DrayOS 5
macOS Smart VPN Client Setup
- Run SmartVPN app and add a profile as follows:
- Select EasyVPN (Auto Mode) as Type
- Give it a Profile Name
- Enter the VPN server’s Domain Name, which applied with a valid certificate for HTTPS service.
- Enter the EasyVPN port configured on the VPN server
- Enter the Username and Password.
- Save the profile
- Tick Enable Profile to enable this profile and click Connect to dial up the EasyVPN connection.
- EasyVPN connection is successfully connected.

Add a comment to this article
NOTE : All comments are reviewed before publication and may not be posted or may be redacted if the editors do not consider them helpful. The use of offensive or obscene language, copyrighted material, or advertising or promotion or linking to any other product or service is prohibited. By submitting your comment, you confirm that you are the original author and assign copyright of the content to DrayTek indefinitely and irrevocably.
